
Nitrogen Deficiency in Wheat: Symptoms and How to Correct It
Yellowing that starts on the oldest, lowest leaves and moves upward is the classic sign of nitrogen shortage in wheat. Learn to read the symptoms, find the cause, and correct it without overdoing the topdress.
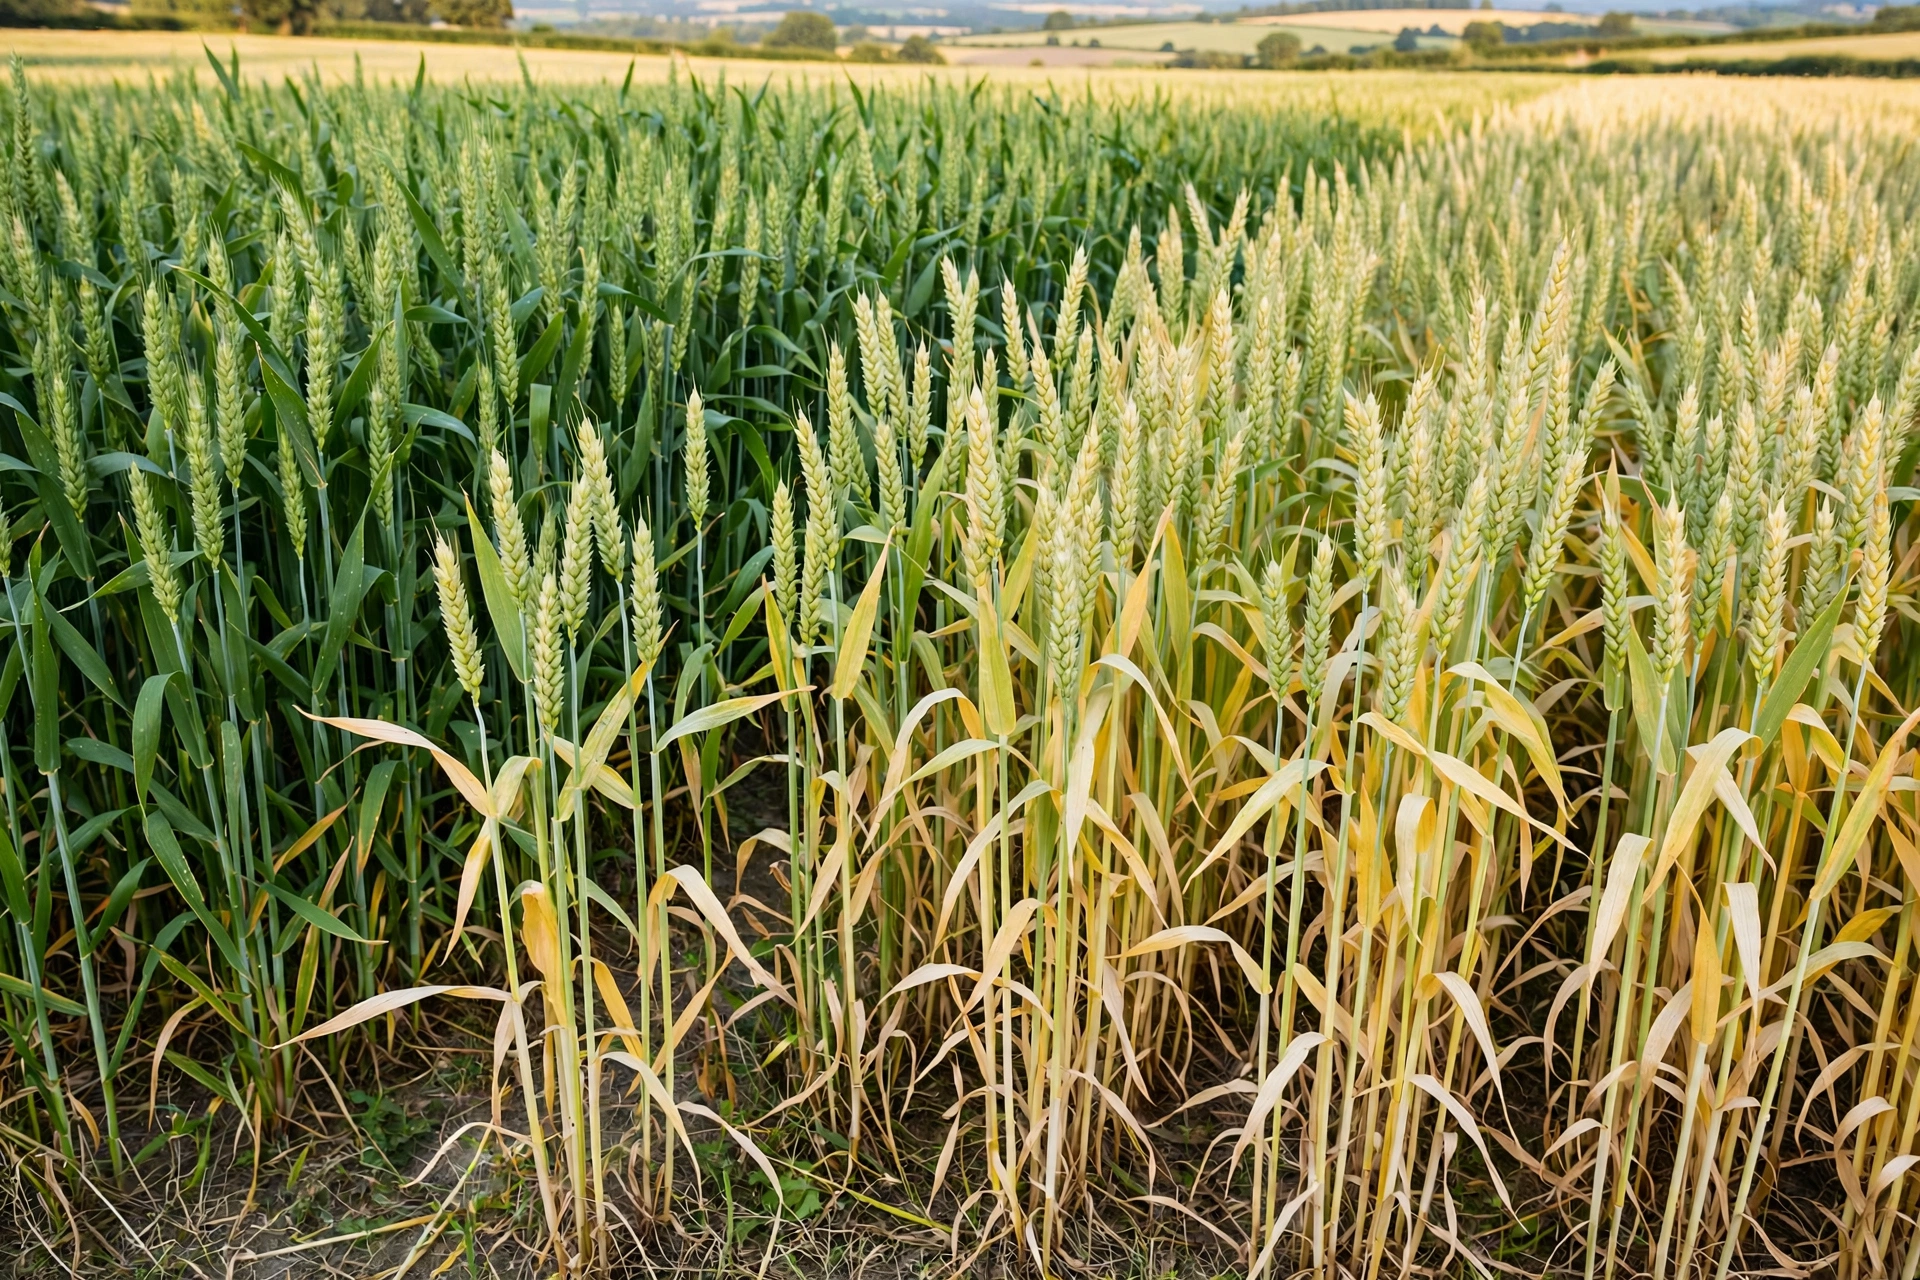
Nitrogen deficiency symptoms in wheat almost always start the same way: the oldest, lowest leaves turn pale green, then yellow, beginning at the leaf tip and working inward, while the newest leaves at the top still look normal. This bottom-up pattern is the single most useful clue in the field. If the yellowing begins on the youngest leaves instead, you are likely looking at a different problem, such as sulfur deficiency, and treating for nitrogen will not fix it.
Why the oldest leaves yellow first
The reason for this pattern lies in how the plant handles nitrogen. Nitrogen is mobile inside the plant, so when roots cannot supply enough, the wheat plant pulls nitrogen out of its older leaves and ships it to the growing tip, where new growth is happening. The older leaves are sacrificed first. That is why the crop can look acceptable from a distance — the top of the canopy stays green — while the lower canopy is clearly starving. Walking into the field and parting the canopy to look at the lower leaves is the correct way to check.
As the deficiency deepens, the yellowing spreads upward leaf by leaf, and the whole plant takes on a pale, washed-out appearance. Growth slows visibly: plants stay short, stems grow thin, and tillering — the process where one wheat plant produces multiple productive shoots — drops off. Fewer tillers mean fewer ears per plant, and fewer ears per plant is one of the most direct routes to a lower harvest. Ears that do form are often smaller, and grain from nitrogen-starved wheat typically has lower protein content, which matters for both milling quality and market price.
In severe cases the entire field develops a uniform yellow-green cast that is visible even from the road. Leaves may develop a slight pinkish or reddish tinge along the edges in some varieties, and the oldest leaves die back completely. By the time the flag leaf — the last leaf before the ear, which feeds most of the grain — starts yellowing early, a large part of the season's yield potential has already been lost, because the plant has been running short through the growth stages that set tiller number and grain number.
Common causes beyond under-dosing
The most common cause is simply under-dosing: the total nitrogen applied was below what the crop and the soil together could supply. But many fields are short of nitrogen despite an apparently adequate dose, and then the cause is loss rather than under-application. Heavy rain on light, sandy soils washes nitrate below the root zone. Waterlogged patches lose nitrogen to denitrification. Urea broadcast on the surface in warm weather loses ammonia to the air. And a delayed topdressing — the nitrogen arrives after the tillering window has closed — means the plant needed it when it was not there.
Telling nitrogen apart from lookalikes
A useful diagnostic habit is to compare patterns. Nitrogen deficiency moves from old leaves upward and is fairly uniform across the field, though low spots and sandy patches show it first. Sulfur deficiency also yellows leaves, but it starts on the youngest leaves because sulfur does not move inside the plant the way nitrogen does. Waterlogging makes the whole plant pale at once and usually comes with soggy soil and stunted roots. Herbicide injury or disease tends to show patches, streaks, or spots rather than the smooth bottom-up yellowing of nitrogen shortage. Getting the diagnosis right saves both money and time.
Preventing deficiency before it starts
Soil testing before the season is the best prevention, because it tells you the starting nitrogen status of your field instead of forcing you to guess. During the season, many extension services recommend leaf color charts — simple printed cards you hold against a leaf to judge greenness — as a low-cost way to decide whether a topdressing is actually needed. A wheat crop that is deep green at tillering probably does not need extra nitrogen yet; a crop fading to pale green at the same stage is asking for it. These observations beat the calendar as a timing guide.
Correcting deficiency without overdoing it
To correct a deficiency once you see it, the standard practice is a topdressing of urea, applied before an irrigation or a rain so the granules wash into the soil. The amount should follow your local recommendation or soil test result — a common working approach is to apply the planned topdress portion of the season's total nitrogen, typically split between tillering and jointing stages. Spreading urea on dry soil in hot weather without following water invites volatilization losses, so timing the topdress just ahead of irrigation is one of the highest-value details in wheat nitrogen management.
Timing matters as much as amount. Nitrogen applied during tillering feeds tiller survival and ear number; nitrogen at jointing feeds grain number and grain protein. Nitrogen applied much later, after flowering, does little for yield and mostly risks lodging — the crop falls over — along with delayed maturity and wasted money. If you discover the deficiency late in the season, a modest correction can still help grain filling, but be realistic: nitrogen cannot rebuild tillers that were never formed.
One mistake to avoid is overcorrecting. It is tempting to double the topdress when the crop looks hungry, but excess nitrogen makes wheat tall, soft-stemmed, and prone to lodging, delays ripening, and increases disease pressure in dense canopies. It also costs money twice — once for the fertilizer and once in the harvest you lose to a lodged crop. The goal of correction is to bring the crop back to an adequate, balanced level, not to push it beyond it. Follow the recommended dose, not the panic.
Prevention for the next season starts with records. Note how much nitrogen you applied, when, how, and what the crop looked like at each stage. If the same field shows deficiency every year despite full doses, the problem is probably loss — leaching on sandy soil, poor drainage, or surface application — and the fix is a change in practice, not a bigger bag. Splitting the total nitrogen into two or three applications, incorporating the basal dose at sowing, and keeping drainage open are the three most reliable preventive habits.
Balanced nutrition also helps nitrogen do its job. Phosphorus and potassium deficiencies limit root growth and overall vigor, which makes nitrogen uptake less efficient even when nitrogen is present. A crop short of everything often looks short of nitrogen first, because nitrogen symptoms appear earliest. That is another reason a pre-season soil test is worth its cost: it tells you which nutrient is actually limiting, so you correct the right one.
Finally, remember that wheat varieties, soils, and climates differ, and no article can replace a local recommendation. The symptom descriptions here help you read your field, but the exact dose and timing for your area should come from your agricultural extension service, a soil test report, or the verified recommendations published for your region. Diagnosis is in your hands; the prescription should be grounded in local data.
To put a precise number on your correction, use the dose calculator at /calculator — enter your crop and area and it works out the urea and DAP quantities per acre or per hectare. The verified crop recommendations under /crops give region-specific doses with their sources, /fertilizers explains how urea behaves in soil, and the /faq covers practical questions about splitting and mixing fertilizers. Catching nitrogen deficiency early and correcting it with the right amount at the right time is one of the cheapest yield gains available in wheat farming.